Solved – Camera Failed To Start Issue In Android
Solved – Camera Failed To Open Issue In Android:- You take out your phone to capture a wonderful moment and then your camera says it’s on leave today. How great would that be? Most of us would have faced this issue with our smart cameras at one point or the other in our lives. Camera failed to start is a very common issue among different kinds of Android phones, so don’t worry, you are not alone. Dive into the article to learn how to efficiently tackle this issue on your own.
Solution 1 : Simply Reboot Your Phone
Easy things first. The most effective solution to most of the Android issues is a simple reboot. Do you believe it? Well if you don’t, just turn off your phone and turn it on to see if that works.
Solution 2 : Try Clearing The Camera App Cache
Sometimes a simple reboot wouldn’t be enough. In that case, you might want to try out the following steps to solve your issue.
STEP 1
STEP 1
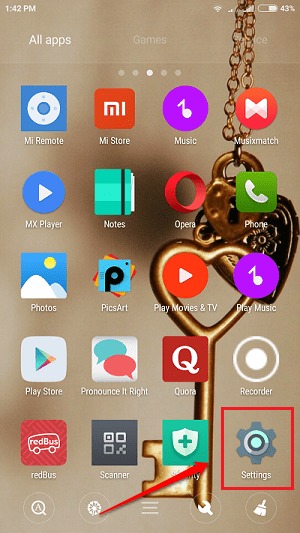
- Launch the Settings app by clicking on its icon.
STEP 2
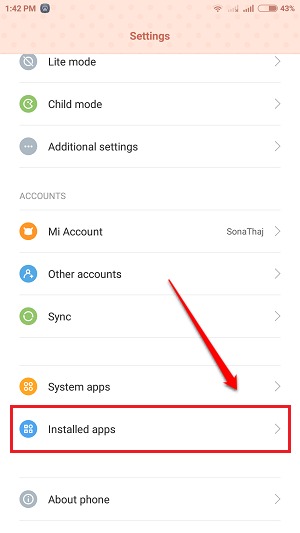
- Now scroll down to find and click on Apps or Installed Apps option as per your phone’s settings.
STEP 3
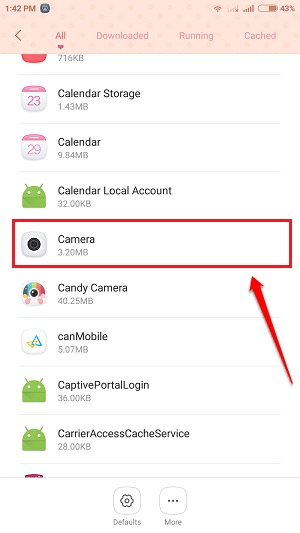
- Find the entry for Camera app and click on it.
STEP 4
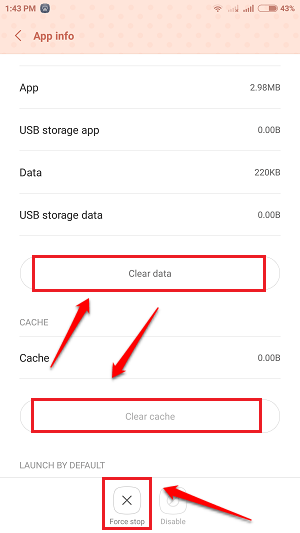
- This will open up the App Info for Camera app. Clear the Data and Cache for the app. Don’t worry, this won’t delete your photos, it’s just the settings. As next, click on the Force Stop button. Try opening the Camera app to see if it works.
Solution 3 : Try The Factory Reset
If none of the above two solutions work, maybe you have to get it right the hard way. In this solution, we are going to perform a reset on your phone. This will erase all your phone data. So take a back up of everything before you proceed. Remove the memory card if there is valuable data in it. Export the contacts from your phone book and keep it safe.
STEP 1
STEP 1
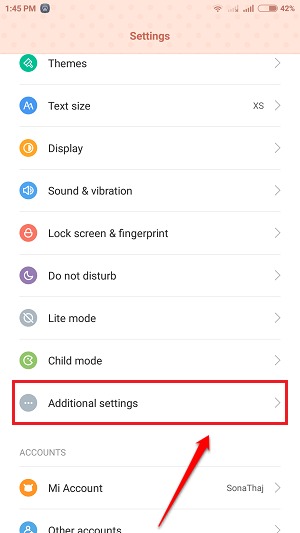
- Open Settings app again. Scroll down and find an option by the name Backup & reset. If you can’t find it, click on the Additional Settings option as some phones have different User Interfaces.
STEP 2
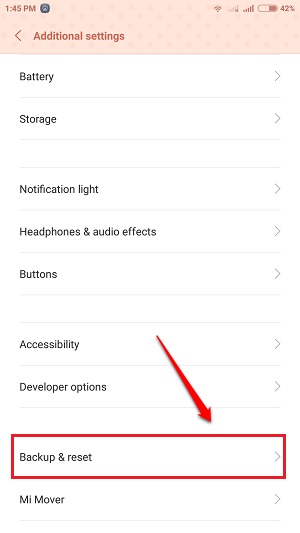
- You will be able to find the Backup & reset option from the Additional Settings.
STEP 3
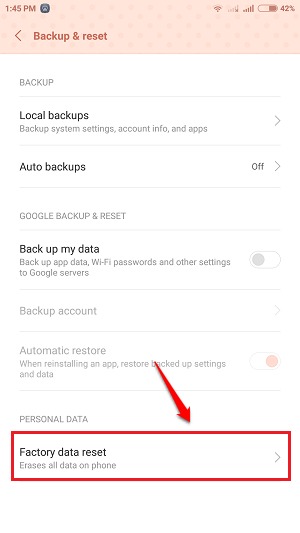
- In the Backup & reset settings, you will be able to find an option named Factory reset data. Click on it when you are ready and sure.
STEP 4
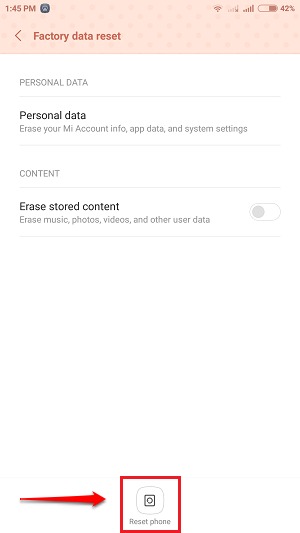
- Set your preferences and trigger the reset by clicking on the Reset phone button as shown in the following screenshot. Now wait for some time for your phone to do the work and be back.
If none of the above solutions work, it could be because of faulty hardware. Hope you found the article useful. Feel free to leave comments if you are stuck with any of the steps. We would be happy to help.
Post a Comment